Home Page |
MICHIGAN FORESTS FOREVER TEACHERS GUIDE
| MAP & COMPASS |  |
Introduction
Using maps and compasses have many applications in math and geography. It's also a pretty good skill to have if you spend much time in the wild, besides just being a fun thing to practice (once you get the hang of it!). It helps if you're the kind of person that can visualize the landscape from a set of more-or-less arbitrary symbols (i.e. a map!).
There are two main approaches to using maps and a compass.
1. Find your way through the landscape, or
2. Describe the area of a feature IN the landscape.
The first approach involves a predetermined direction or set of directions. The second approach involves the discovery of a set of directions. An example of approach one would be to run a forest inventory grid through an ownership. Or, to find your way from the car to a hunting stand, already marked on a map. An example of approach two, would be to calculate the area of swamp or a timber sale area. In either case, you also have to have some way to measure distance while you travel. For general approximations, a person's pace is a reasonable method, if you know your pace and have had enough practice to make it reliable. Establishing your pace is discussed below.
Why the Old Technology?
Actually, in most cases, using a GPS (Global Positioning System) unit can be mighty handy. It has many options. However, there are a couple of downsides that can give a map and compass an advantage.
1. Maps and compasses dont have batteries that die (which will almost always happen while youre the farthest away from anything that looks familiar!).
2. Maps and compasses are a LOT cheaper than a GPS unit.
3. Compasses can be used under dense forest canopies that will block satellite acquisition from most GPS units.
| Activity Suggestion Map & Compass |
Going From Point
"A" to Point "B"
Measuring An Area in the Landscape
Determining Your Pace
A Note About Compasses
True vs. Magnetic North
Going From Point "A" to Point "B"
| Exercise Suggestion: From a marked point in a field next to the school (or several marked points), students can "discover" what a series of azimuths "point to" from that marker (i.e. water tower, prominent building, flag pole, etc.). If "pace" is used, less obvious markers can be placed in the field for students to "find" using a given azimuth and distance. |
This is probably the most common use of a compass. It assumes that you already know where you are on a map and that you know where (on a map) that you want to go. You must first discover the azimuth of the line connecting Point "A" and Point "B". This can be done with a standard map compass or with a protractor. Once in the field, you set your compass to the pre-determined azimuth and use the compass to maintain your direction until you find Point "B" in the field.
1. Turn the compass wheel (bezel) until "N"
is next to the notch in the front of the compass.
2. Orient the map to the compass. Line up the edge of the compass with the
edge of the map. Rotate both map and compass together until the magnetic needle is
aligned with the "painted" needle under the compass housing. The map is
now oriented so the "north" side is really pointing north. Don't move the
map anymore! But you can move the compass.
3. Line up the edge of the compass along the route you wish to follow from Point
"A" to Point "B". You'll have to move the compass. Be sure
the front of the compass is going the same direction that you want to travel.
4. While holding the compass firmly against the map, turn the housing until the
"magnetic" needle is directly above the "painted" needle. Read
the azimuth at the notch in the front of the compass wheel. That is the azimuth you
must follow in the field.
Note: If you use protractors (cheaper than compasses), you do not have to orient the map. However, you do need to imagine a 360 degree array beginning from your Point "A". The protractor can be used to identify which "ray" (in degrees) describes the line from Points "A" to Point "B". This may involve some addition or subtraction depending upon the protractor design and orientation of your directional line.
5. Stand at Point "A" in the field (a known
place on the map that is easy to find in the field).
6. Check to be certain that your compass wheel is set to the pre-determined azimuth
(azimuth on the wheel is next to the notch in the front of the compass).
7. Keeping the compass flat and in front of you, turn your body until the magnetic
needle is directly above the painted needle. The compass is now pointing in the
direction that you want to go.
8. Identify something in the distance that is in-line with where the compass is
pointing (not in line with the direction the magnetic needle is pointing!).
9. Walk towards that "something". Regularly check your compass (step
7) to make sure you are not straying from the pre-determined direction.
10. Repeat steps 7-9 until you locate Point "B".
Measuring an Area in the Landscape
| Exercise Suggestion: A simple traverse can be set up in an open field next to the school by marking the turning points with wire stakes or other markers. More than one simple traverse can be set up, with a team of students at each traverse, or a team of students beginning at different turning points of the same traverse. |
This is called a "traverse". Essentially, a series of lines are measured (azimuth and distance) in the field that encloses whatever it is that you want to measure the area for. Beginning from a known point on a map, look to where you want to go, record the azimuth of that direction before you go, and measure the distance between where you are and the next point.
To measure an azimuth in the field, point the compass in the direction you wish to go. Without moving the base of the compass, turn the compass wheel until the magnetic arrow is directly above the painted needle. Read the azimuth next to the notch in the front of the compass. Walk to the next point, following the azimuth and measuring the distance (often by counting paces, see below).
Continue to record compass "legs" around the area until you return to where you began.
Back in the classroom, use your compass or a protractor to draw the "polygon" onto a map (be aware of the scale of the map!). The traverse will probably not close exactly. Not to worry, but the closer the better. The area of the polygon can be calculated using a "dot grid" or other area measurement devices calibrated to the map scale.
| Dot Grids: A dot grid is a tool used to estimate the area (usually acres) of a polygon on a map. It is simply a transparent sheet with dots marking the imaginary intersections of a regular line grid. Each "dot" that falls within the map polygon represents a unit of area. The dot grid can be calibrated to the map by counting the number of dots within a known polygon on the map, and dividing the number of acres by the number of dots (i.e. 40 acres / 22 dots = 1.8 acres per dot). |
Determining Your "Pace"
A pace is two steps. A count of paces should begin with the left foot, and counts made each time the right foot falls. Every person will have different number of paces in a given distance and different number of feet per pace. To determine an individual pace, mark a distance of 100 feet (outside or in a long hallway). Have the students walk the distance several times, counting their paces. Make sure everyone walks normally, not trying to stretch or shorten their pace. Average the counts. Divide that average into 100. That is how many feet a student's pace is. As students "pace" distances in field exercises, they simply multiply their pace (distance) by the number of paces they counted.
For example, a student may average 21.5 paces in 100 feet. Their pace would measure 4.6 feet. If they paced an unknown distance for a count of 76 paces, the distance would be 4.6 x 76 = 349.6 (350 rounded) feet.
If long distances need to be "paced", it is easier to count the number of paces in a certain distance, such as a chain or a mile. For example, an adult may have 1100 paces in one mile. If they walked a count of 650 paces, then 650 / 1000 would be a distance of 0.59 miles. More commonly, foresters know their number of paces per chain, which is a land survey unit of 66 feet. As the forester walks across the landscape, it is fairly easy to measure distance by dividing a pace count by their known number of paces per chain (usually 12 or 13 paces per chain). Furthermore, foresters know to adjust their pace with changes with topography, in deep snow, on snowshoes, the time of day, and other conditions. With experience and practice, a walking pace can become a fairly accurate method of distance measurement.
A Note About Compasses
There are many types of compasses. However, the most useful compass for orienteering consists of a clear plastic rectangular base with a raised wheel containing a magnetic needle. The wheel can turn. The outside of the wheel has marks for the 360 degrees of a circle, or more commonly has marks for each two degrees.
Some compass wheels have four circle quadrants, each labeled from 0 to 90 degrees. This is a bearing compass (image on the left). Don't use them. It's too confusing. Use an azimuth compass, which uses 360 degree labeling.


True vs. Magnetic North
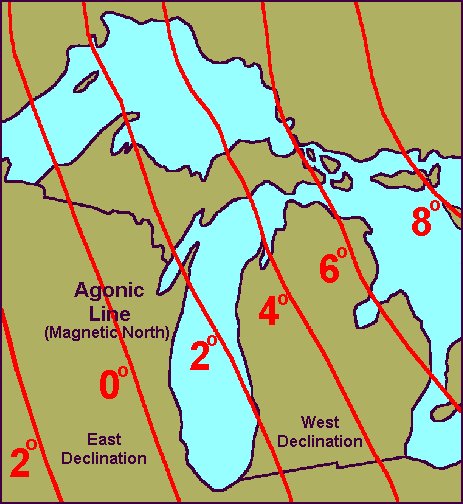 |
We all know that magnetic north is usually not quite true north. True north is the direction from wherever you are to the north end of the Earth's axis. The magnetic field of the Earth is usually not aligned with true north. The amount that magnetic north varies from true north is variable. The line of zero degrees declination is called the "agonic line."
The difference between "true north" and "magnetic north" is called declination. In Michigan, declination varies from zero (true north equals magnetic north) near Ironwood and Benton Harbor, to about six degrees west in Sault Sainte Marie and Detroit. Better compasses have a feature where declination can be adjusted to remove the bias of magnetic north. For most compasses with a built-in declination adjustment, the compass wheel should be turned clockwise (in Michigan). To make matters more complex, the Earth's magnetic field is not static. Declination lines change over time.
Lastly, there are local magnetic anomalies that can render compasses next to useless. Iron ore deposits in parts of the U.P. will make compasses behave erratically. However, most of the time, it pays to follow the compass even when it doesn't quite seem right.
 |
This website was developed and created by Michigan State University Extension for the teachers of the State of Michigan. |
Page Name:
TreeBasics/MapCompass.htm